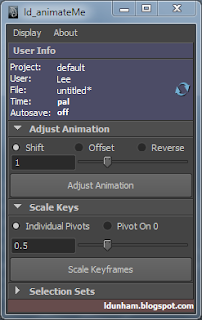
Re-arrange, offset and reverse keyframes, plus other useful tools.
To Install:
Place the downloaded "ld_animateMe.mel" file into one of your Maya scripts directories, restart Maya and use the following code to load the UI.
ld_animateMe;
To Use:
animateMe is designed to be compact and clutter free, giving you the valuable screen space you need.
Besides minimizing the frames for each section, you can remove it from the tool under the "Display" menu by unchecking the related box. If you cant it back, simply re-check the box.
As well as clicking the relevant buttons, you can use the sliders to adjust the value you want and once released, it will run that tool, making it as quick as possible to use.
- User Info:
The user info is designed to quickly let you know some useful information regarding your scene that could potentially save hassle later, such as; Forgetting to turn auto-save on, or whether your animating to 24fps or 25. The information is reloaded on creation of the UI, or by clicking the refresh icon to the right.
- Adjust Animation - Shift mode:
To adjust animation, you must select keyframes from either the timeline, or the curve editor.
Entering a number will shift the selected keys by that value, whether positive (ie "2" = shift selected keys 2 frames later, or "-2" = shift selected keys 2 frames earlier.)
EDIT: 19/01/2012 - v 1.2.0
- If no range in timeline or keys selected in curve editor, animtaion will be adjusted from current point onwards.
- Adjust Animation - Offset mode:
To adjust animation, you must select keyframes from either the timeline, or the curve editor.
Offset animation works with your selection order. It will offset every selected object's selected keyframes by X amount of frames relative to the object selected before it.
1. object1, 2 and 3 each has a key on frame 1.
2. You select them in numerical order (object1 first and object3 last).
3. You use Offset mode with value of 2.
4. object2's key will now be at frame 3 and object3's key will now be at frame 5.
- Adjust Animation - Reverse mode:
You can reverse your animation by selecting the keys from either the timeline, or the curve editor.
- Scale Keys - Individual Pivots:
To use scale keys, you must have keys or curves selected in the curve editor.
For every key selected, it will scale it at the point between its previous and next value, as if it was blending the key between the keys either side. It works great for toning up or down, facial expressions, poses etc or even adding overshoot.
- Scale Keys - Pivot on 0:
To use scale keys, you must have keys or curves selected in the curve editor.
This mode will scale all the selected keys the same pivot of 0.
- Selection Sets:
Compact version of ld_selectMe (Link).
Maya's own selection sets are node based, meaning that creating a selection set for a character will only work in that file, which is and very limiting. This tool, instead, compiles a selection script and saves it to shelf to be used in any file, along with a toggle selection function by ctrl+clicking the shelf button.
"Name" is to enter the name of the button as it will appear on the shelf.
"clear" clears the list and name field.
"+" adds selected objects to list.
"-" removes selected list items from list (can also press "delete" key).
EDIT: 19/01/2012 - v 1.2.0
- Now creates selection shelf button that will attempt to use namespace of the FIRST currently selected object, if no objects currently select, default one is used.
News/Updates:
Version 1.5.0 is underway, automating the user info with extra information displayed, such as the last saved time for the current file, snapping tools (including component snapping), and a new Scale Keys mode, called "Falloff".
Thanks to quick feedback, I've been able to make some adjustments to the functionality of the tool.
Version 1.2.0:
19/01/2012 -
Edited functionality of Adjust Animation.
- If no range in timeline or keys selected in curve editor, animtaion will be adjusted from current point onwards.
Edited functionality of Selection Sets.
- Now creates selection shelf button that will attempt to use namespace of the FIRST currently selected object, if no objects currently select, default one is used.
Version 1.2.1:
19/01/2012 -
Fixed issue with Selection Sets update.
- If current selection's namespace didnt't contain an item in selection list, it would error, it will now instead just use default namespace.
Any suggestions, please let me know.


so what I find this morning on cgtalk... lee's tools. thanks lee!! :} the reverse and scale keys are awesome!
ReplyDelete