Tuesday 31 January 2012

Mel/Python: Adding number padding

I was looking through some older scripts and hit across my dirty attempt to add number padding, and I was surprised it actually worked.
I went about tidying it up and came up with this little number in mel.
global proc string rt_addPadding(int $num,int $padding) { int $lengthNum=size(string($num)) ; string $padString; if($lengthNum<$padding) for($i=0;$i<($padding-$lengthNum);$i++) $padString=$padString+"0" ; return $padString+string($num) ; }
Which works ok, and then a couple of minutes searching I came across a post by Nathan which instead uses python (and is far better).
string $pad = `python ("'%0"+$padding+"d' % "+$num)`;
This then is used as this.global proc string rt_addPadding(int $num,int $padding) { return `python("'%0"+$padding+"d' % "+$num)` ; }
Useful :)

Thursday 26 January 2012

Bird Rig: Current WIP

Geraint Wright asked if I could build a quick rig for a sparrow animation (model would be supplied).

This is where it is atm. (still alot of work to go into it) but alot of the base ideas are there.


The separation of the feathers was far simpler than I though actually, using a couple of curves and the very useful pointOnCurveInfo nodes (same nodes used in motionpaths but without the extra crap), then just a basic heirachy of dependencies of controllers and aim constraints (the feather bending is hideous but was only quickly thrown together, needs more thought behind it so expect that to change).
One issue (kinda solved, looking into better solutions) was due to the aim constraint, feathers wouldn't react accordingly to folding or certain positions, especially when pulled about a fair bit. Simple solution was to declare the aims up object as another controller (well, one for each segment).
Alot of automation (of course each with manual overrides and on/off blending) will be needed to get a smoother transition and to 'hide' any smaller issues, included with a smart system to fold the wing (some scripting required).
The animation it'll be used in you wont really see much of the detail but I'd rather put the work in now if any shots/ideas for closer cuts are thrown in...

References:
http://forums.cgsociety.org/showthread.php?f=7&t=836433&highlight=wing
http://www.brendanbody.co.uk/flight_tutorial/index.html

Wednesday 18 January 2012

ld_animateMe v1.0.0

ld_animateMe now available! - Download
current version 1.2.1


Re-arrange, offset and reverse keyframes, plus other useful tools.

To Install:
Place the downloaded "ld_animateMe.mel" file into one of your Maya scripts directories, restart Maya and use the following code to load the UI.

ld_animateMe;

To Use:
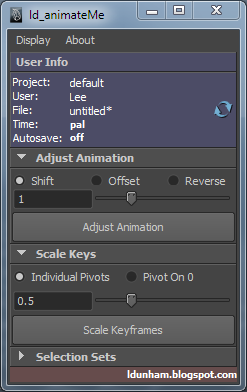
animateMe is designed to be compact and clutter free, giving you the valuable screen space you need.
Besides minimizing the frames for each section, you can remove it from the tool under the "Display" menu by unchecking the related box. If you cant it back, simply re-check the box.
As well as clicking the relevant buttons, you can use the sliders to adjust the value you want and once released, it will run that tool, making it as quick as possible to use.

 - User Info:
The user info is designed to quickly let you know some useful information regarding your scene that could potentially save hassle later, such as; Forgetting to turn auto-save on, or whether your animating to 24fps or 25. The information is  reloaded on creation of the UI, or by clicking the refresh icon to the right.

 - Adjust Animation - Shift mode:
To adjust animation, you must select keyframes from either the timeline, or the curve editor.
Entering a number will shift the selected keys by that value, whether positive (ie "2" = shift selected keys 2 frames later, or "-2" = shift selected keys 2 frames earlier.)
EDIT: 19/01/2012 - v 1.2.0
- If no range in timeline or keys selected in curve editor, animtaion will be adjusted from current point onwards.

 - Adjust Animation - Offset mode:
To adjust animation, you must select keyframes from either the timeline, or the curve editor.
Offset animation works with your selection order. It will offset every selected object's selected keyframes by X amount of frames relative to the object selected before it.

1. object1, 2 and 3 each has a key on frame 1.
2. You select them in numerical order (object1 first and object3 last).
3. You use Offset mode with value of 2.
4. object2's key will now be at frame 3 and object3's key will now be at frame 5.


 - Adjust Animation - Reverse mode:
You can reverse your animation by selecting the keys from either the timeline, or the curve editor.

 - Scale Keys - Individual Pivots:
To use scale keys, you must have keys or curves selected in the curve editor.
For every key selected, it will  scale it at the point between its previous and next value, as if it was blending the key between the keys either side. It works great for toning up or down, facial expressions, poses etc or even adding overshoot.

 - Scale Keys - Pivot on 0:
To use scale keys, you must have keys or curves selected in the curve editor.
This mode will scale all the selected keys the same pivot of 0.

 - Selection Sets:
Compact version of ld_selectMe (Link).
Maya's own selection sets are node based, meaning that creating a selection set for a character will only work in that file, which is and very limiting. This tool, instead, compiles a selection script and saves it to shelf to be used in any file, along with a toggle selection function by ctrl+clicking the shelf button.
"Name" is to enter the name of the button as it will appear on the shelf.
"clear" clears the list and name field.
"+" adds selected objects to list.
"-" removes selected list items from list (can also press "delete" key).
EDIT: 19/01/2012 - v 1.2.0
- Now creates selection shelf button that will attempt to use namespace of the FIRST currently selected object, if no objects currently select, default one is used.


News/Updates:
Version 1.5.0 is underway, automating the user info with extra information displayed, such as the last saved time for the current file, snapping tools (including component snapping), and a new Scale Keys mode, called "Falloff".
Thanks to quick feedback, I've been able to make some adjustments to the functionality of the tool.

Version 1.2.0:
19/01/2012 -
Edited functionality of Adjust Animation.
   - If no range in timeline or keys selected in curve editor, animtaion will be adjusted from current point onwards.
Edited functionality of Selection Sets.
   - Now creates selection shelf button that will attempt to use namespace of the FIRST currently selected object, if no objects currently select, default one is used.

Version 1.2.1:
19/01/2012 -
Fixed issue with Selection Sets update.
  - If current selection's namespace didnt't contain an item in selection list, it would error, it will now instead just use default namespace.

Any suggestions, please let me know.


Sunday 15 January 2012

RigReel 2010-11

Finally got round to uploading last years rig reel, still finishing off current one, will upload as soon as its done.


Reel Breakdown:

Sequence 1 (0026):
Rigged character ('Skitter') in Maya.
Setup nCloth dynamics for screen and node-based rig for timewarp in Maya.

Sequence 2 (0201):
Rigged character, 'Skitter', in Maya;
 - Modular built, stretchable and dynamic tail rig based on hair dynamics with full Fk control system and blending, and control over main dynamic attributes to tweak shot specific and avoid intersection with props.

Sequence 3 (0937):
Rigged prop (table) in Maya;
 - Fully driven by expressions to assist animators and provide continuity throughout show.

Sequence 4 (1034):
Rigged all characters and props in Maya;
 - Including all facial rigs.
 - All characters include controllable dynamic tails and ears, to assist animators and to assist retaining animation continuity.

Sequence 5 (1225):
Rigged  character (Splish) in Maya;
 - All rigs scaleable to assist animation.
 - Stretchable Ik/Fk style spine rigs, identical setup and control for all characters to retain familiarity and allow interchangeable animation.

Sequence 6 (1655):
Rigged  characters (Splish and Splash) and prop (controller), in Maya.

Sequence 7 (1855):
Rigged  character (Splish) in Maya;
 - All rigs with squash/stretch limbs, Ik/Fk blending, auto-flatten and foot-roll.

Sequence 8 (2173):
Assisted in animation in Maya, once rigging was complete.
Co-created Studio specific Animation and Pipeline Toolsets, including;
 - Ik/Fk snapping,
 - shared user creatable and customizable selection sets,
 - animation key/curve cleaning, blending and re-timing,
 - customizable animation trails,
 - animation HUDs and automatic notification of shot completion and versioning.

Friday 13 January 2012

Maya: Starting scripts on load - userSetup.mel

To execute scripts, whether custom or local, each time you startup maya (in the studio ours check important prefs, timeUnits etc) is very simple.

All you need to do is create a mel script called "userSetup.mel" and place it into you maya/scripts folder in your documents (of course there are instances, depending on what the script is doing, if its messing with mainWindow states etc, you need to make sure they load first by using the "evalDeferred" command - at least that's what I've come to believe.

For example if you created a mel script like this;
string $win=`window` ; columnLayout -adj true ; text -label "Hello World" -align "center" ; setParent.. ; showWindow $win ;
called it "userSetup.mel" and placed it into maya/scripts/  folder, on starting maya, you can expect to see a window with the text "Hello World" pop up when maya starts.
Generally this idea is taken further (if in a studio) and either each user's environment vars point to a userSetup.mel on the network, or each have their own userSetup.mel on their local machine that points to a separate startup script on the network, which then its fairly simple for the user to modify their own startup, based on their preferences.

At some point, once I get some time, I do intend on revisiting and furthering most of my posts, taking the time to actually explain what's going on and why, and giving links the right documentation.

Comments welcome.

Maya: IK Handles not updating on undo

I had this problem a few times (even back on maya 5), where you set up a rig, and you point constrain the ikHandle to a control object. It moves around fine, up until you undo. The handle just doesn't seem to behave properly, and scrubbing or moving it again will snap the ikHandle to where it should be.
So I thought I might give a workaround.
Directly constraining an IkHandle seems to have the issue of not updating when undoing.
It seems to be a clash with the way the ik handles and constraints evaluate, and something seems to get missed.
You can avoid this by parenting the ikHandle under the controller, or (if you want the outliner to be tidy) you can parent the ikHandle under a null or locator and constraint that instead.

EDIT:
Brad Clark (Co-founder - riggingdojo.com) provided more info and suggested a better solution.
You shouldn't have this problem if you turn off the snap setting on the ik handle. Then it won't be trying to get back to the end of the chain and should stick with the constraint target. There is a bug with Maya Undo though that if you are moving a node and hit the undo hot key before releasing the mouse button for the current transform, it will undo the previous transform, leaving the move you just did outside of the que, causing an offset that has to be fixed by hand.

Comments welcome.

Maya: Typical Sound/Audio issues during playback.

Another frequent problem is not being able to hear audio during playback, but working fine whilst scrubbing.

Typically, the issue could be down to your playback settings.
Just open your maya preferences, and under "Time Slider", check your "Playback Speed" is at Real-time. If its at anything else you wont hear the audio during playback.

Maya: Window display issues - "...Panel is torn off."

This seems to be a frequent problem, in which some people result in doing a complete reinstall!.

Problem:
Cant show my graph editor/outliner/etc window, keeps telling me "... Panel is torn off."

What this typically means is that somewhere along the line the window has been placed off-screen, usually happens when users either switch monitors around or remove a monitor.
A few very simple fixes, and any one of them should solve your problem.

1.  You can reset your maya's window preferences simply by deleting the "windowPrefs.mel" located in your maya prefs folder ("USER\My Documents\maya\2011-x64\prefs\") whilst maya is CLOSED. Dont worry, once opening maya again, it will automatically create the "windowPrefs.mel" file again, all windows should now load at their default position.
2. You can edit the "windowPrefs.mel" file, to tell maya where to place the windows, just open it in a text editor (notepad usually does the trick, and again whilst maya is closed), and for each window you'll see a "-topLeftCorner" flag with 2 numbers after it. Change them to something like 10 10, save the mel file and load maya.
3. If you only have 1 rogue window you can use mel to reposition the window (you will of course need to know the name of the window, found when trying to load the window - as long as you have "Echo all commands" ticked on in the script editor)
window -e -tlc 10 10 "graphEditor1Window" ;
Now depending on the window your trying to reposition, the naming convention might differ from ending in "Window" or "Panel#Window" ("#" is the number id of the window, typically its 1).
Again, any questions etc, please feel free to comment.

Thursday 12 January 2012

Python: Create a file listing a folders contents

Our co-ord was just trying to get some info together so I come up with this simple little script to print the contents of a specified folder into a dated file.
I'm aware there are better methods of writing the file (using the list and write each item individually in loop etc), but it was short and does the job.

To get the date, I simply used the datetime module and retrieved today's date (as stipulated on local machine), then converted it to a familiar format.
For writing the file, I simply joined a sorted list of files found into a string separated by a newline, opened a writeable doc, deposited the data and closed it to allow access. import os import datetime def ld_listFiles(path,resultPath): fileString='\n'.join(sorted(os.listdir(path))) d=datetime.date.today() date=d.isoformat() filePath=resultPath+'filesListResults_'+date+'.txt' thefile=open(filePath,'w') thefile.write(fileString) thefile.close() return fileString # ld_listFiles('C:/Users/Lee/Desktop/Documents/','C:/Users/Lee/Desktop/')
...and of course this can then be furthered for error checking (making sure paths exist, folders contain files etc), nativePath conversion (not sure of correct terminology), specify file extensions/types, folder contents, file sizes, modification date etc. This is just a very simple example (and perhaps not a great one, but it works).
In fact I think I might spend some time in creating a decent version.
Any tips, suggestions etc, are more than welcome!

Tuesday 10 January 2012

Mel: Parenting shape nodes to new parents (ie polyMesh to Joint)

Was asked about combining a polySphere/nurbsSphere to a joint, so selecting the sphere still selects the joint.

Its fairly simple actually, its the same way as you would combine two nurbs curves under one transform node (to get more complex/detailed control objects).

string $parent="joint1"; string $shape="pSphereShape1"; parent -add -shape $shape $parent;
As simple as!

Saturday 7 January 2012

Mel/Python: Splitting a string by a string (tokenize vs .split)

I know its only a small post and I don't go into detail, more of an outline... it really did bug me was how there are no expressions for tokenize.
I spent a bit of time trying to split a string (ie "L_clavicle_bind_jnt") by with the string "_bind_".
What I found with using tokenize was that it will split the string by the characters instead of the entire string, which to me, was a pain in the backside as I wanted {"L_clavicle","jnt"} but what i'd get with tokenize was {"L,"clav","cle","j","t"}. Now this wouldn't do, and I could find any out of the box way of doing this (I wanted to replace "_bind_" with "_IK_", etc to search), so I ended up turning to python (yet again).
It couldn't be simplier.
"L_clavicle_bind_jnt".split("_bind_")
Which translated as -
python("'"+$child+"'.split('_"+$namespace+"_')") ;
Thinking about it now, im sure there is a command to do this in mel, I just cant find it...

Thursday 5 January 2012

Using Python list comprehension

Just a quick example of how I use list comprehension to search for matching entries in two lists (of course there's x amount of ways to do this, and results will vary depending on usage).

# two lists with some matching entries a=['jon','mary','frank'] b=['lewis','frank','jon','clive','betty','toni','jim'] #typical method using for loop with if/in statement results=[] for i in a: if i in b: results.append(i) print results # with list comprehension results=[x for x in a if x in b] print results

Adding notes to nodes in Maya through mel

Its fairly straightforward to add notes to a node in Maya (under Attribute Editor, add text to under Notes section), but through mel there's one more step you need to go through before you can.

Simply put, the node needs a "notes" (or s/n "nts") attribute first, then its plain sailing (manually writing a note creates the attr, which then stores the string - or so im assuming, looks like that's handled through a scriptJob)
So to add a note to a node, first check whether it already has an attribute called "notes", create one if not, then write something.
string $node[]=`polyCube` ; if(!`attributeQuery -node $node[0] -ex "notes"`) addAttr -ln "notes" -sn "nts" -dt "string" $node[0] ; setAttr -type "string" ($node[0]+".notes") "This node now has a Note. You can store various bits of information here." ; (The note on this script example is on the transform node of the polyCube object ($node[0]) as $node[1] would be the shape object)

Wednesday 4 January 2012

Iconicles VFX Showreel


My work includes;
All Character/Prop Rigs, as well as - Animation, Dynamics, Animation Tools and Pipeline Development/Tools.


Still sorting current showreel, will be up asap.

Selecting animated objects

Quick little script for selecting any (dag) objects with animation on.
string $allObjects[]=`ls` ; select -cl; for($i=0;$i<`size($allObjects)`;$i++) if(`keyframe -q -keyframeCount $allObjects[$i]` != 0) select -tgl $allObjects[$i] ;
I was already aware that mel doesn't need curly brackets "{}" following if statements or for loops (will only execute the next line of code), it seems that it doesn't need them even if your incorporating another statement or loop :) such as the above code shows...

Tuesday 3 January 2012

Toggle lighting script

simple script to toggle the lighting between "default" and "use all lighting" on the current panel.
string $currentPanel=`getPanel -withFocus` ; string $mode="default" ; if(`getPanel -to $currentPanel`=="modelPanel") if(`modelEditor -q -dl $currentPanel`=="default") $mode="all" ; modelEditor -edit -dl $mode $currentPanel ;